Connecting to the projector in the Board Room is astraightforward process, but there are a few simple obstacles that can trip youup. You can connect to the projector either hardwired or wirelessly, and thereare instructions for both methods below. One other major thing to take noticeof is your audio output; if it is set improperly, you will not have your audioprojected. Instructions for setting this correctly are included below as well.
Hardwired
First, turn on the projector with the white remote.
Plug the cable labeled ‘Projector’ into the appropriate porton your computer (the cable has a dongle at the end that you can de/reattach toswap between HDMI and USB-C depending on what ports you have available on yourmachine.
Once you’re plugged in, if your screen is not beingprojected, press ‘Source Search’ on the white remote (the blue button on thetop-right of the remote). It will take a moment to find the next availablesource, so please be patient. Further, because it goes in order, it might firsttake you to an alternate source instead of the correct source, so once it’ssettled, simply repeat the process until you arrive at HDMI 2.
Once your screen is projecting, make sure that your audio isprojecting as well. If it is not, scroll down to the ‘Confirming That YourAudio is Projecting’ section and follow the instructions there.
Wireless
First, turn on the projector with the white remote.
Then, if you don’t see the ScreenBeam home page, press‘Source Search’ on the white remote (the blue button on the top-right of theremote). This will take a moment to find the next available source, so pleasebe patient. Further, because it goes in order, it might first take you to analternate source instead of the correct source, so once it’s settled, simplyrepeat the process until you arrive at HDMI 1.
From here, how you connect on Mac and on Windows differs, soplease follow the instructions relevant to your operating system.
On Mac:
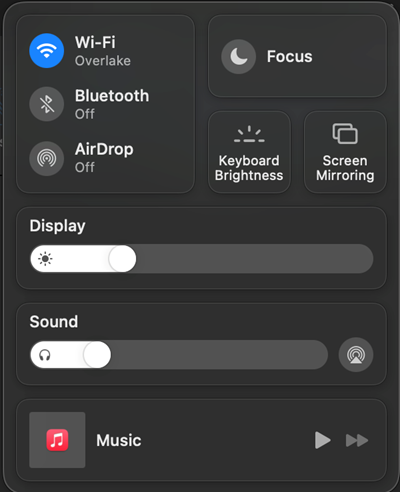
In the top-right corner of your screen, next to the date andtime is the Control Center. Its icon looks like this: ![]() . When you open that,you should get something that looks like this:
. When you open that,you should get something that looks like this: 
Select the ‘Screen Mirroring’ tile and after a moment a listof available wireless projection options will appear. Loading in all theoptions can be a little slow, so please be patient.
Once you see ‘CC-BoardRoom-SB’ on the list, click it, andafter a moment you should be prompted for a PIN on your computer screen.
Shortly afterwards, the projector screen will display thePIN you need to enter to proceed.
Once you enter the PIN on your computer, it will take amoment to initialize, and then your screen should be projecting! Once yourscreen is being projected, you need to confirm whether your audio is beingprojected as well. If it isn’t, please scroll down to the ‘Confirm That YourAudio is Being Projected’ Section.
On Windows:
In quick succession, press the Windows key and then the Kkey, and a list of available wireless projection options will show up. Thismight take a moment or two, so if you don’t see ‘CC-BoardRoom-SB’ show upimmediately, please be patient.
Once you see ‘CC-BoardRoom-SB’ on the list, click it, andafter a moment you should be prompted for a PIN on your computer screen.
After a moment, the projector screen will display the PINyou need to enter to proceed.
Once you enter the PIN on your computer, it will take amoment to initialize, and then your screen should be projecting! Once yourscreen is being projected, you need to confirm whether your audio is beingprojected as well. If it isn’t, please scroll down to the ‘Confirm That YourAudio is Being Projected’ Section.
Confirm That Your Audio is Being Projected
Once your screen is projected, you need to make sure thatyou’re getting audio. The first thing to check is whether the volume on thePolyCom is up. You can adjust the volume with the black remote.
If you can hear the PolyCom (when you turn the volume up ordown, it will make a small noise that indicates how loud it is) but not yourcomputer, you need to check the audio output source on your computer.
On Mac:
In the top-right corner of your screen, next to the date andtime is the Control Center Its icon looks like this: ![]()

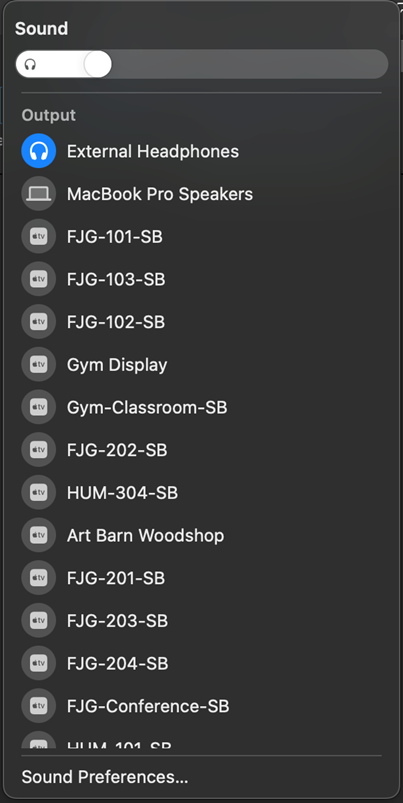
If you hover over the blank space in the ‘Sound’ section,you should see a little arrow pop up in the corner. You don’t need to click onthe arrow, just anywhere in the blank space that makes the arrow show up, andit will change your window to look something like this: 
Select ‘EPSON PJ’ from the list, and then test your audioagain. At this point, you should hear your sound being projected!
If you’re still not getting sound, try turning up the volumeon your laptop; even if it seems that the volume on your laptop should be loudenough, sometimes it takes changing the volume level for your computer torecognize the new output.
If you still don’t hear your audio being projected at thispoint, please call Tech at (425) 602-7176 and we’ll come take a look.
On Windows:
On your taskbar, all the way to right there is a small audioicon, it should look something like this: ![]()
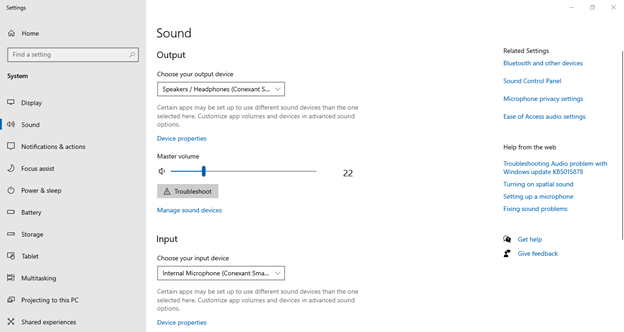
Right-click it and select the ‘Open Sound Settings’ option.You should end up on a screen like this: 
Under the output heading there is a dropdown menu titled‘Choose your output device’. Click the down arrow to pull up the list of outputoptions, select ‘EPSON PJ’ from the list, and then test your audio again.
At this point, you should hear your sound being projected!
If you’re still not getting sound, try turning up the volumeon your laptop; even if it seems that the volume on your laptop should be loudenough, sometimes it takes changing the volume level for your computer torecognize the new output.
If you still don’t hear your audio being projected at thispoint, please call Tech at (425) 602-7176 and we’ll come take a look.